Creating a Kafka Pipeline
This guide walks through the complete Kafka pipeline wizard step by step, connecting to a Kafka cluster, picking a topic, defining a schema, configuring optional dedup/filter/transform, mapping to ClickHouse, and deploying.
Choose pipeline type
From the Create Pipeline page, click Kafka as your data source. The page expands to show the available Kafka pipeline shapes:
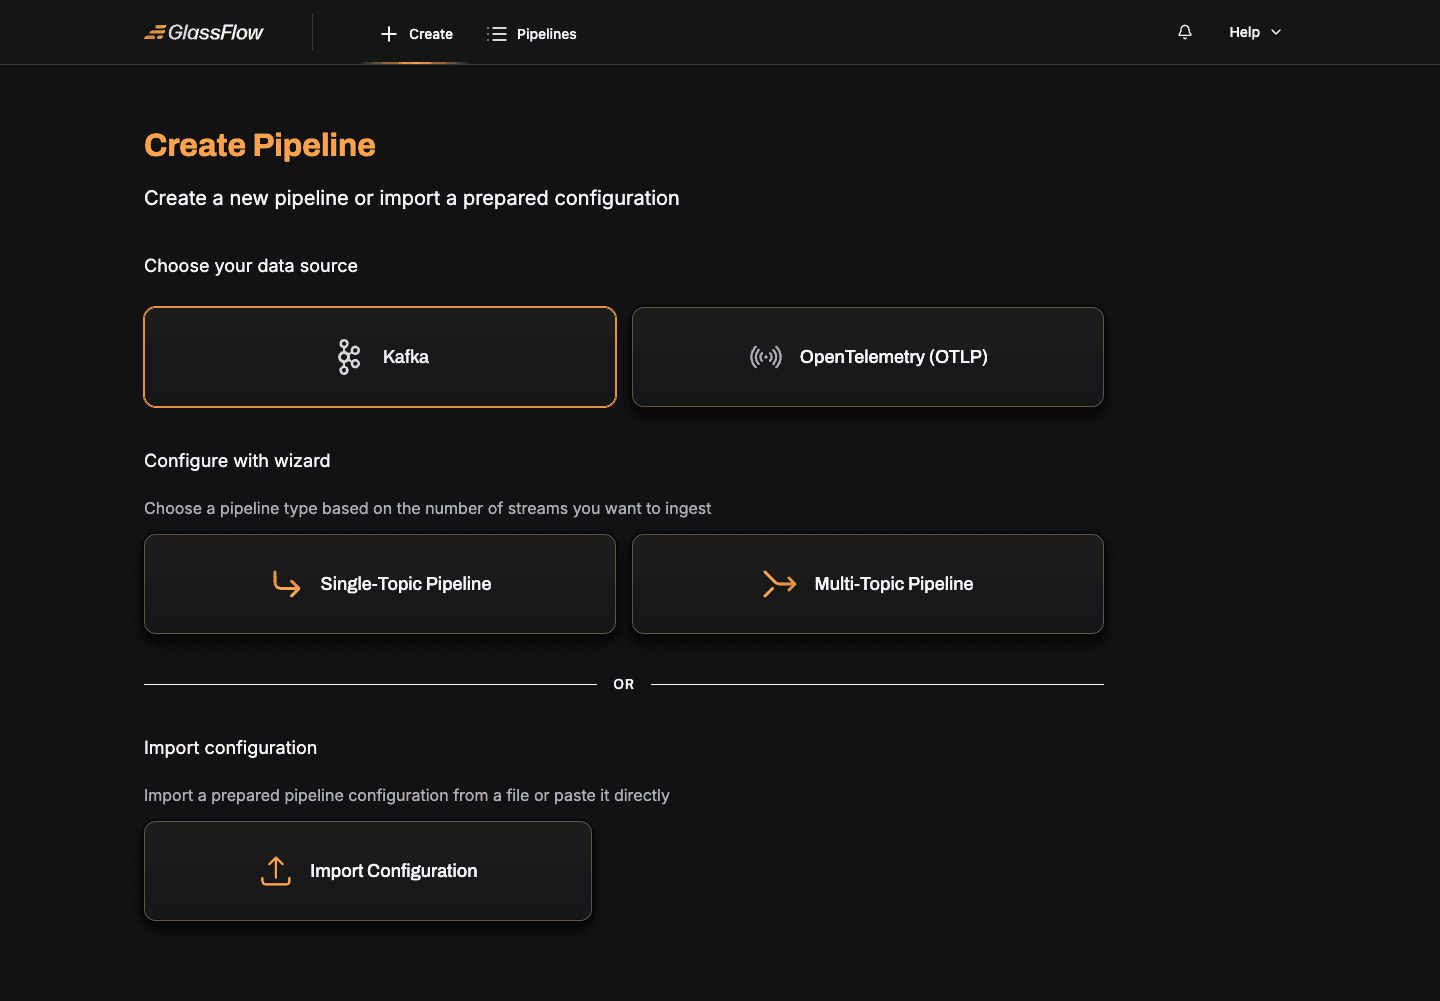
- Single-Topic Pipeline: consume from one Kafka topic, optionally deduplicate, filter, and transform before writing to ClickHouse. This guide covers this shape.
- Multi-Topic Pipeline: consume from two topics and join them temporally before writing to ClickHouse.
Click Single-Topic Pipeline, give the pipeline a name, and click Create Pipeline to enter the wizard.
Setup Kafka Connection
Configure the connection to your Kafka cluster:
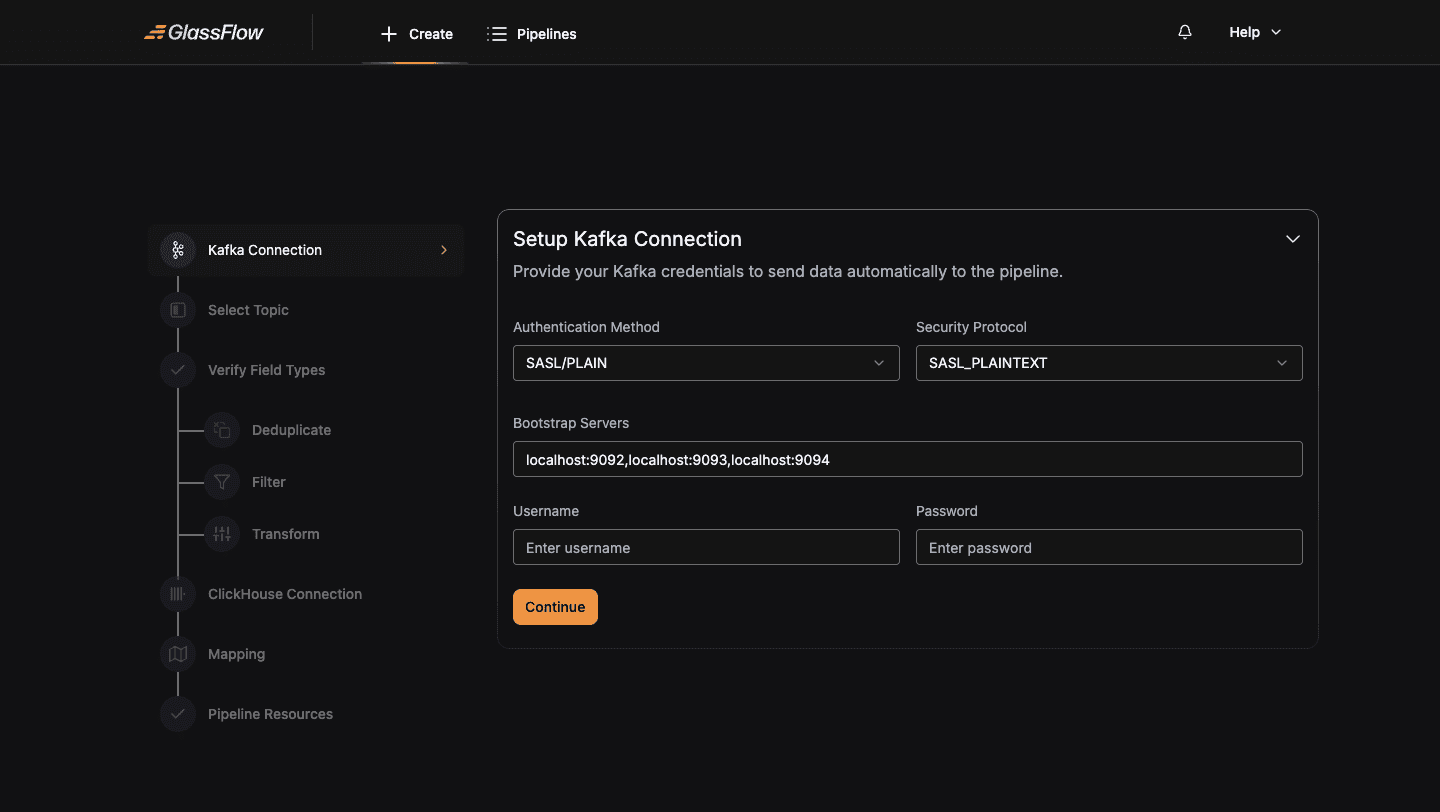
| Field | Description |
|---|---|
| Authentication Method | SASL/PLAIN, SASL/GSSAPI, SASL/SCRAM-256, SASL/SCRAM-512, or No authentication |
| Security Protocol | PLAINTEXT, SASL_PLAINTEXT, SSL, or SASL_SSL |
| Bootstrap Servers | Comma-separated broker addresses (e.g. kafka-1:9092,kafka-2:9092) |
| Username / Password | Required when an authentication method is selected |
For unsecured local development, switch Authentication Method to No authentication: the username/password fields disappear:
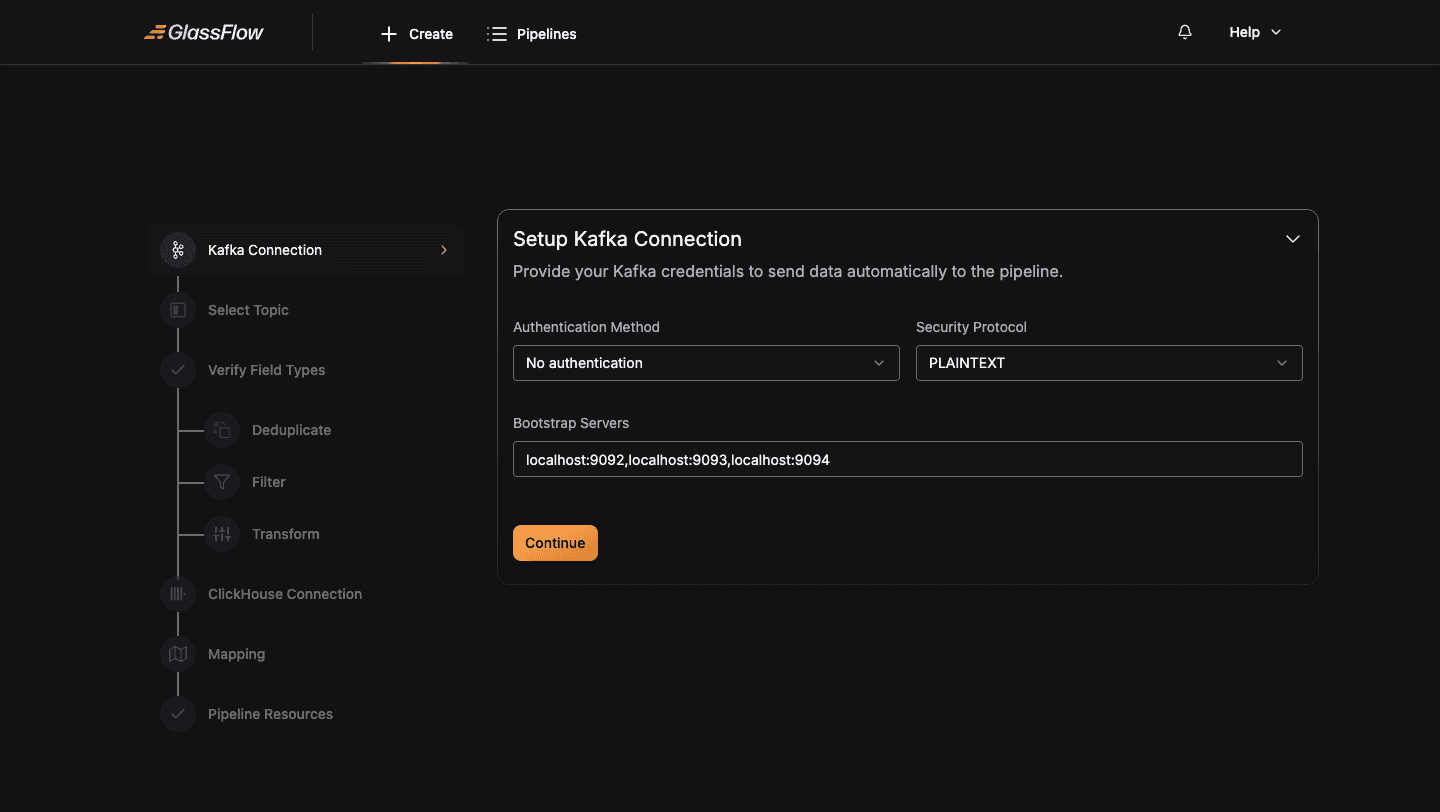
For Kerberos, SSL with custom CA, and other configurations, see the Connections reference.
Click Continue when ready. The wizard validates the connection by listing topics from the broker.
Select Topic
Pick the Kafka topic this pipeline will consume from. The wizard loads a sample event from the topic so it can infer the schema:

| Field | Description |
|---|---|
| Source Topic | The Kafka topic to consume from. The dropdown lists all topics the credentials can read. |
| Initial Offset | earliest (start from the beginning of the topic) or latest (start from the most recent messages, default). |
| Sample event | An auto-loaded sample message used to infer the schema. You can edit this manually if the topic is empty or has heterogeneous events. |
If the topic is empty, the wizard shows “Unable to fetch event from topic, enter event schema manually to proceed”. Paste a representative JSON event into the Sample event editor to continue.
Verify Field Types
The wizard infers a schema from the sample event. Review each field and adjust the data type if the inferred type isn’t what you want downstream:
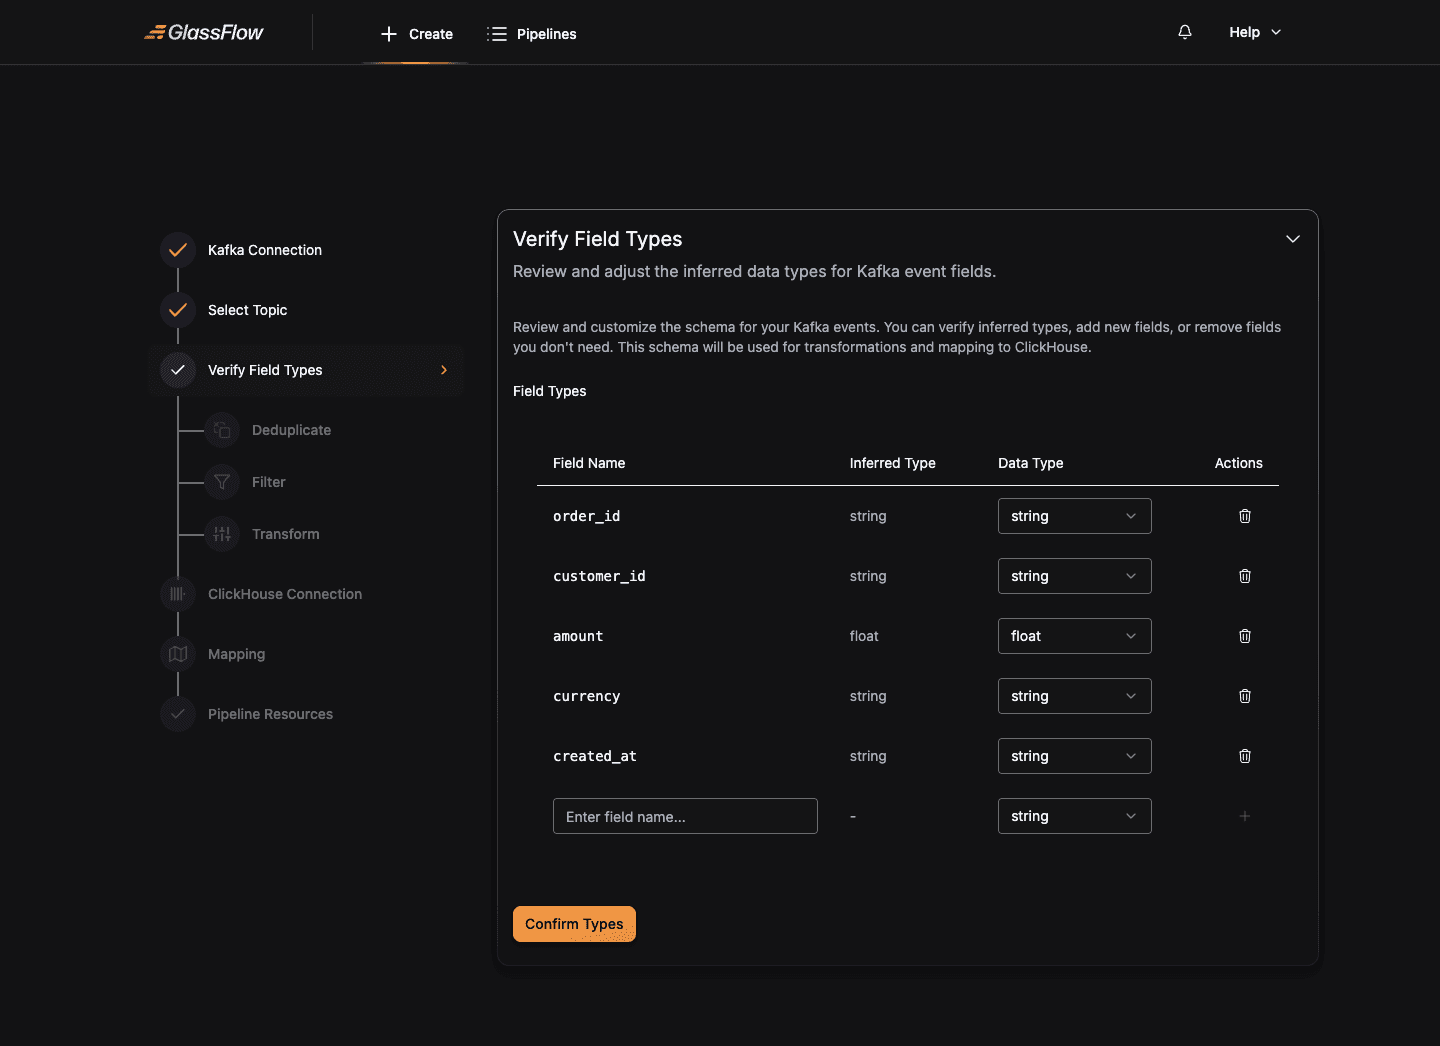
Supported data types: string, bool, int, uint, float, bytes, array.
You can also add new fields (useful for fields that are sometimes-present in the topic but missing from the sample) or remove fields you don’t need to send to ClickHouse.
Click Confirm Types to lock the schema and continue.
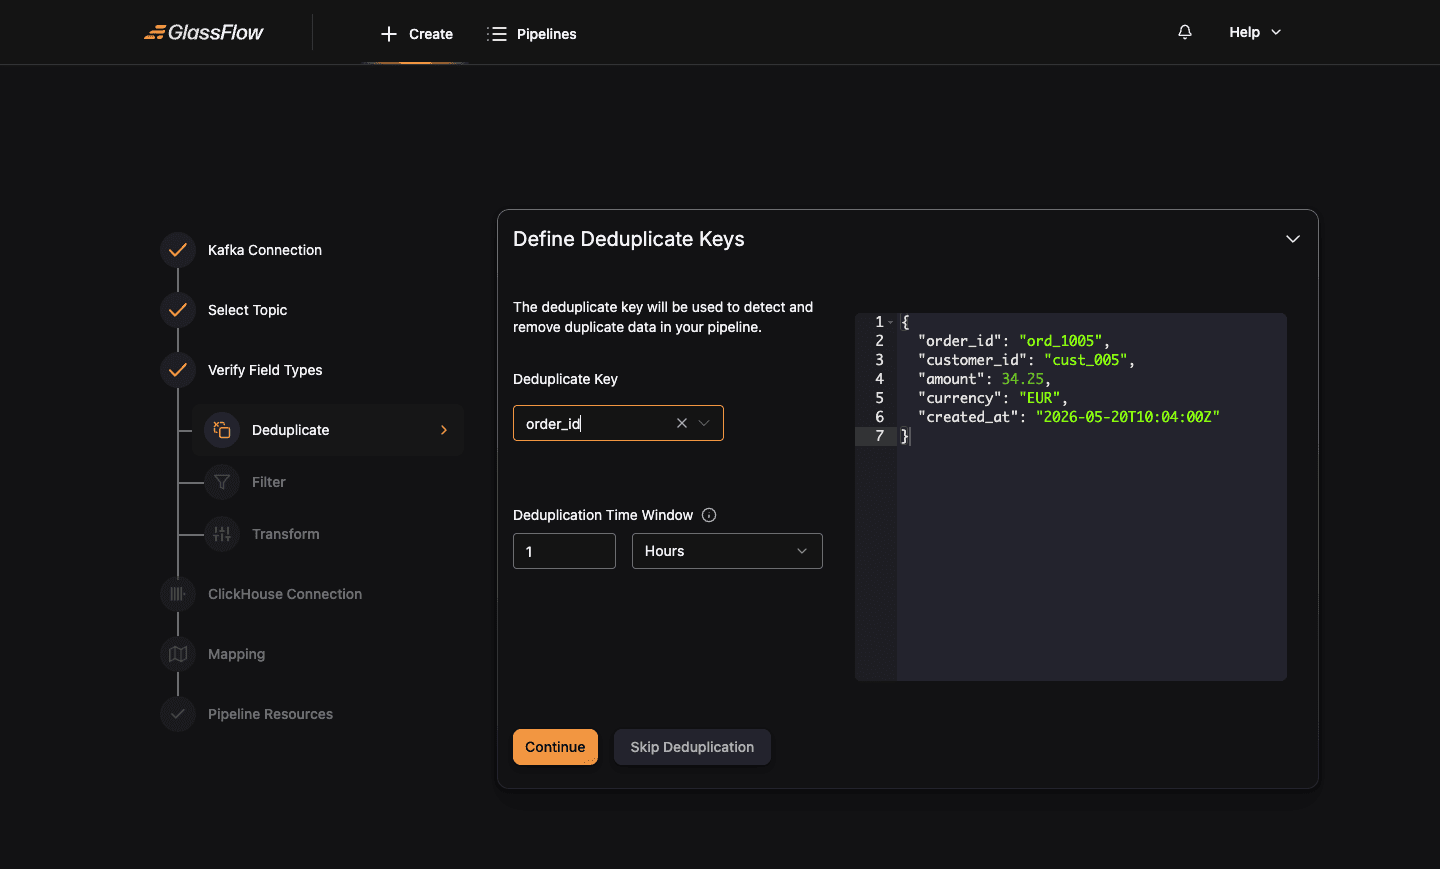
Configure Deduplicate (optional)
Deduplication drops repeat records based on a key and a time window. Skip this step if you don’t need it.
| Field | Description |
|---|---|
| Deduplicate Key | Field used to identify duplicates. Pick whichever field uniquely identifies a record (e.g. order_id, event_id). |
| Deduplication Time Window | A numeric value plus a unit (Seconds, Minutes, Hours). Records with the same key arriving within this window are dropped. |
The right-hand panel shows the sample event so you can confirm which field maps to your deduplication key.
Click Continue to keep the deduplication, or Skip Deduplication to pass all records through unchanged.
Configure Filter (optional)
Filtering keeps only records that match a condition. Skip this step if you want all records to pass through.
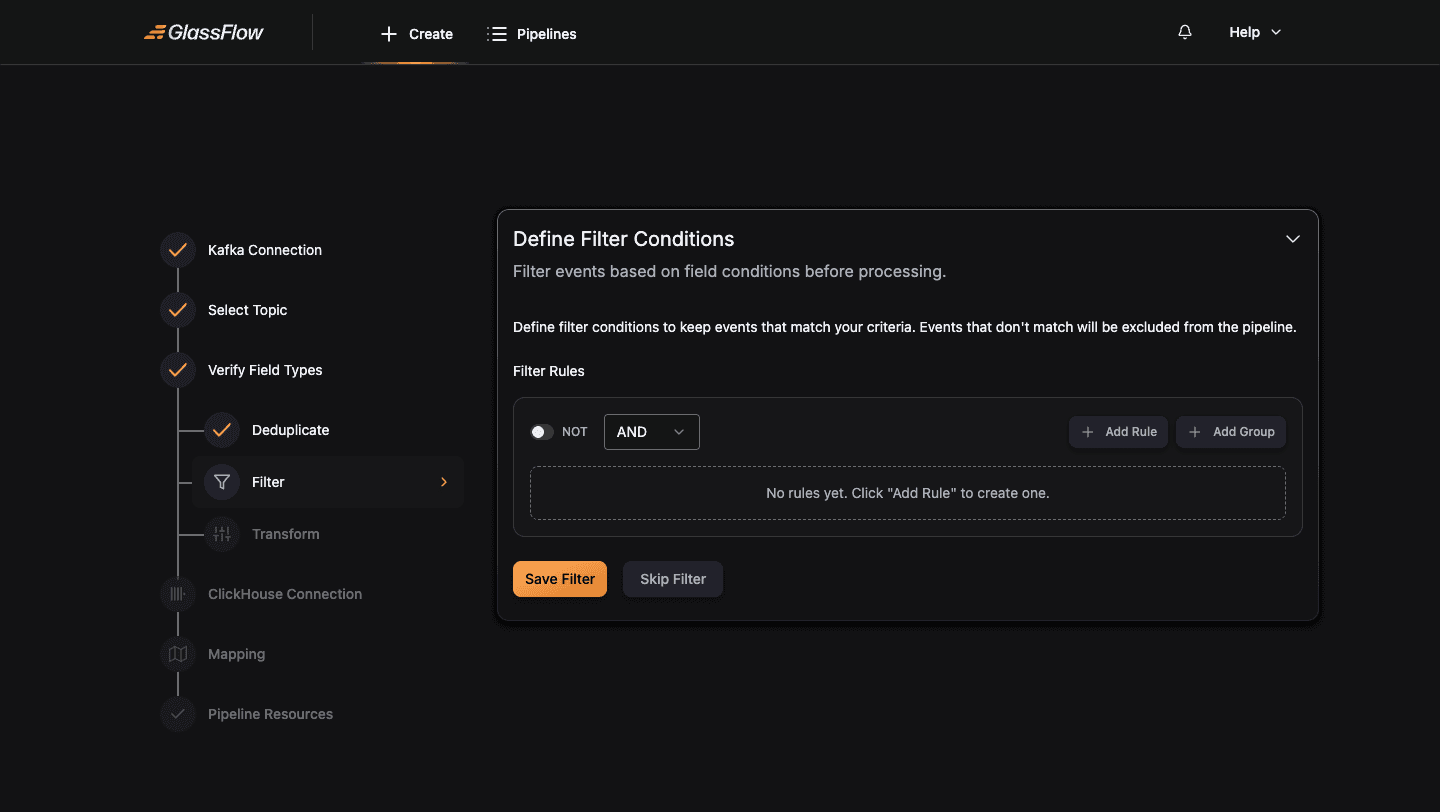
Click + Add Rule to build a condition visually. Each rule selects a Field, a Condition (equals, not equals, greater than, contains, etc.), and a Value:
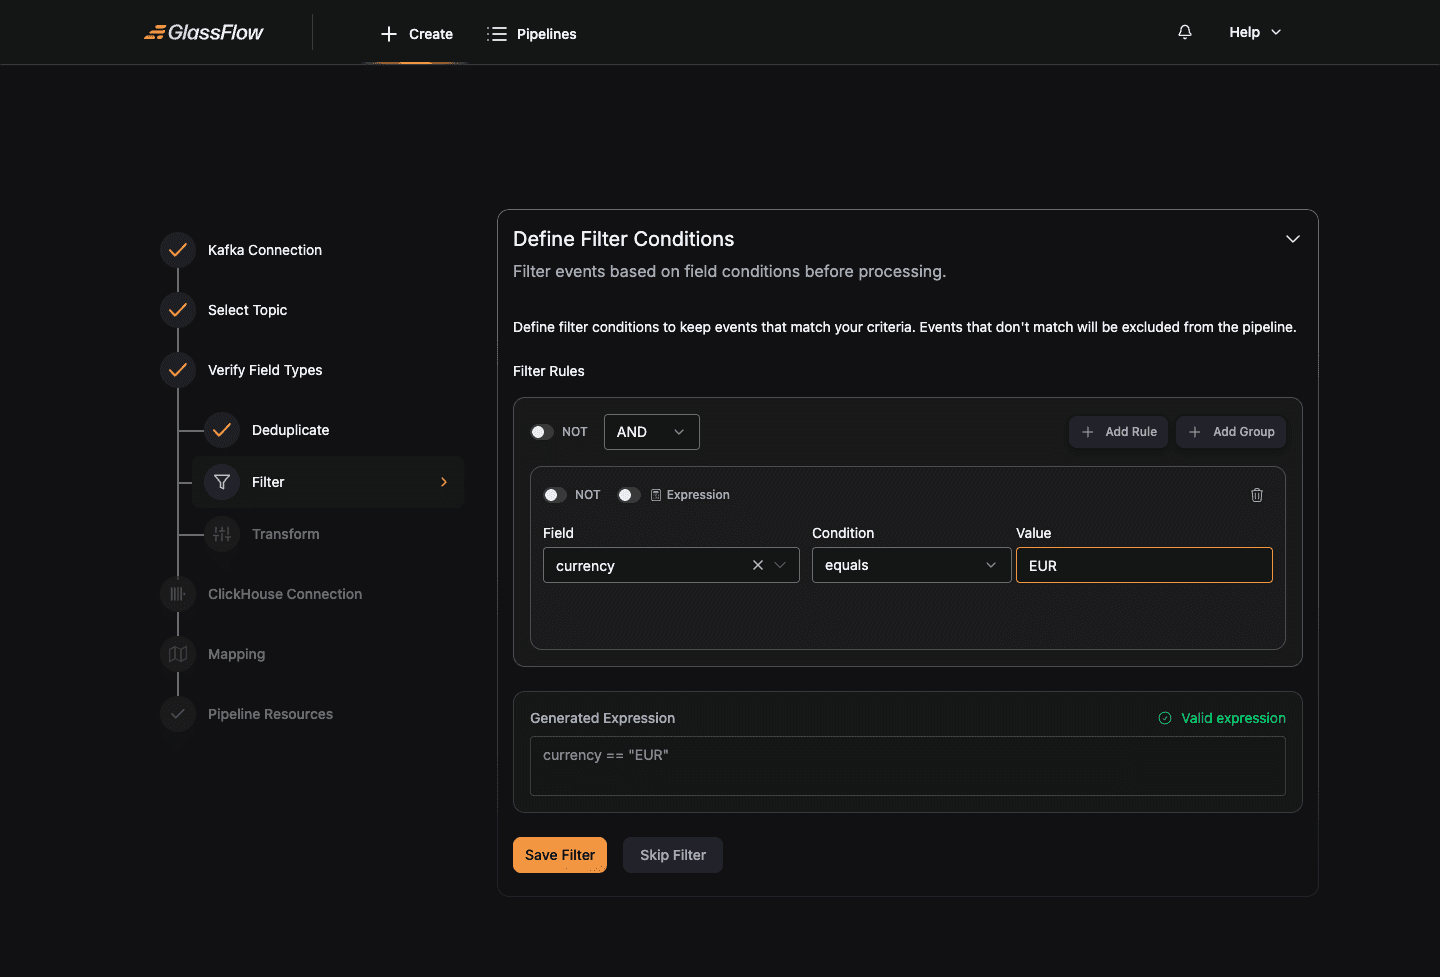
The Generated Expression panel at the bottom shows the equivalent expression syntax. For complex conditions, flip the Expression switch on a rule to enter a raw expression directly.
Combine multiple rules with AND / OR and nest them with + Add Group. The NOT switch inverts a rule or group.
Click Save Filter to apply the rule, or Skip Filter to leave all records pass through.
Configure Transform (optional)
Transformation lets you reshape each record before it reaches ClickHouse, rename fields, derive new ones, drop fields you don’t need.
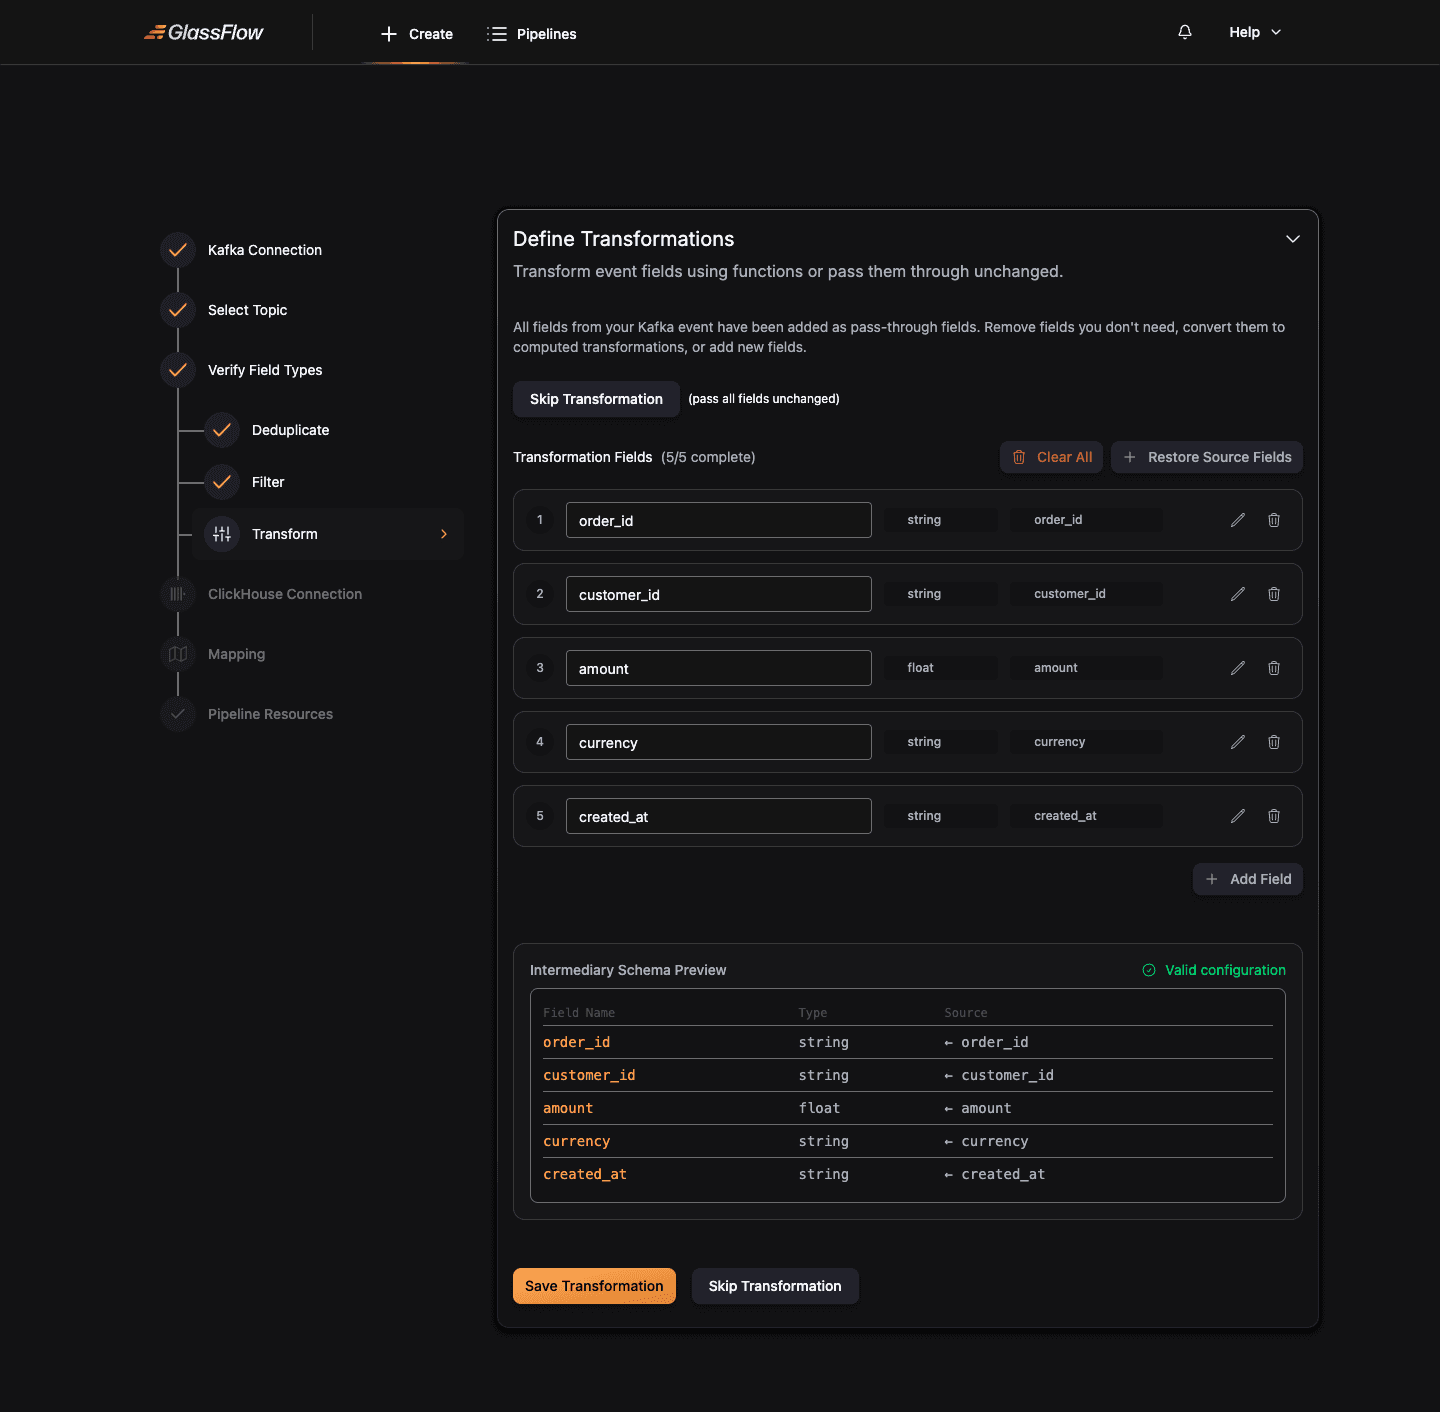
By default the wizard adds every schema field as a pass-through (no rename, no change). From here you can:
- Rename a field, type a new name into the field-name input
- Remove a field, click the trash icon
- Add a new computed field: click + Add Field at the bottom and define an expression
- Restore Source Fields: undo all changes back to the pass-through baseline
- Clear All: start from an empty mapping
Click Skip Transformation to pass all fields through unchanged, or Continue when your transformations are ready.
Setup ClickHouse Connection
Configure the connection to your destination ClickHouse cluster:
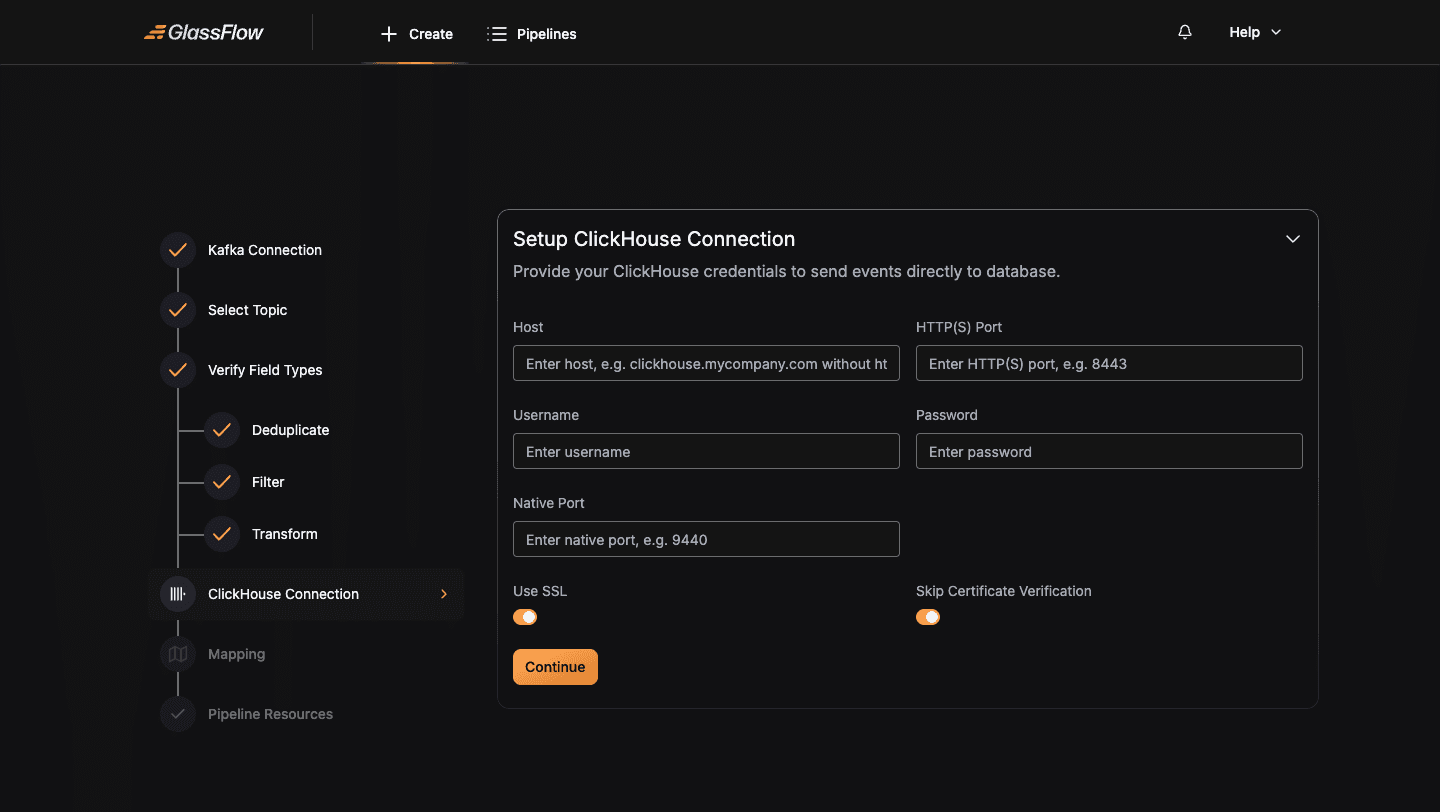
| Field | Description |
|---|---|
| Host | Hostname or IP, without http:// or https:// prefix |
| HTTP(S) Port | HTTP port, 8123 for plain, 8443 for TLS |
| Username / Password | ClickHouse user credentials |
| Native Port | TCP/native port, 9000 for plain, 9440 for TLS |
| Use SSL | Enable for managed ClickHouse offerings (ClickHouse Cloud, Aiven, Altinity.Cloud) that require TLS |
| Skip Certificate Verification | Skip TLS certificate validation, useful for self-signed certs during development |
Click Continue. The wizard validates the connection by issuing a test query.
Configure Mapping
Map your event fields to a ClickHouse table. You can either Create New Table (the wizard issues a CREATE TABLE against ClickHouse) or Use Existing Table (the wizard reads the table’s columns and asks you to map fields to them).
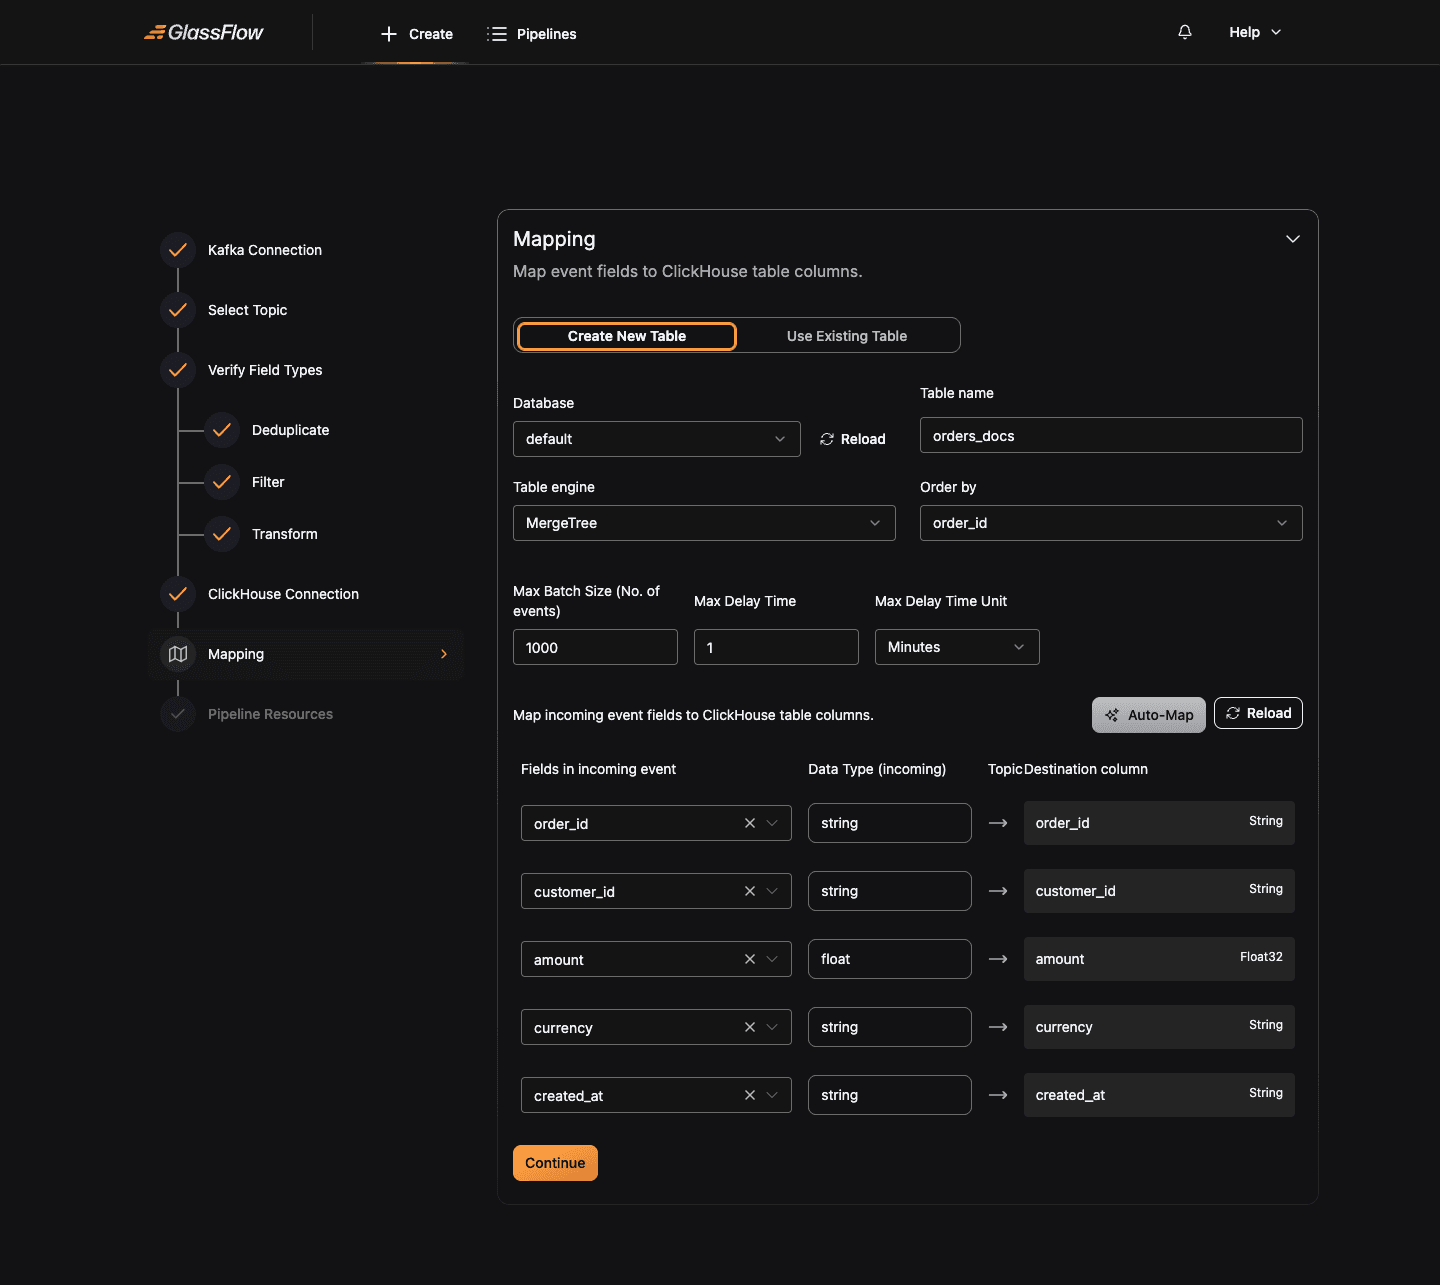
| Field | Description |
|---|---|
| Database | Target ClickHouse database |
| Table name | Name of the destination table (required when creating a new table) |
| Table engine | ClickHouse engine: MergeTree, ReplacingMergeTree, SummingMergeTree, etc. |
| Order by | Primary ORDER BY field for the table |
| Max Batch Size | Maximum number of records the sink batches before flushing to ClickHouse (default 1000) |
| Max Delay Time | Maximum time the sink will wait before flushing a partial batch (default 1 Minute) |
The lower section maps each incoming event field to a ClickHouse column. The wizard auto-fills the column name and infers a ClickHouse type. Click Auto-Map to map fields with matching names, or adjust each row manually.
Click Continue when the mapping is complete.
Configure Pipeline Resources
Set the replica counts and CPU/memory limits for each pipeline component. The defaults are sufficient for most workloads.
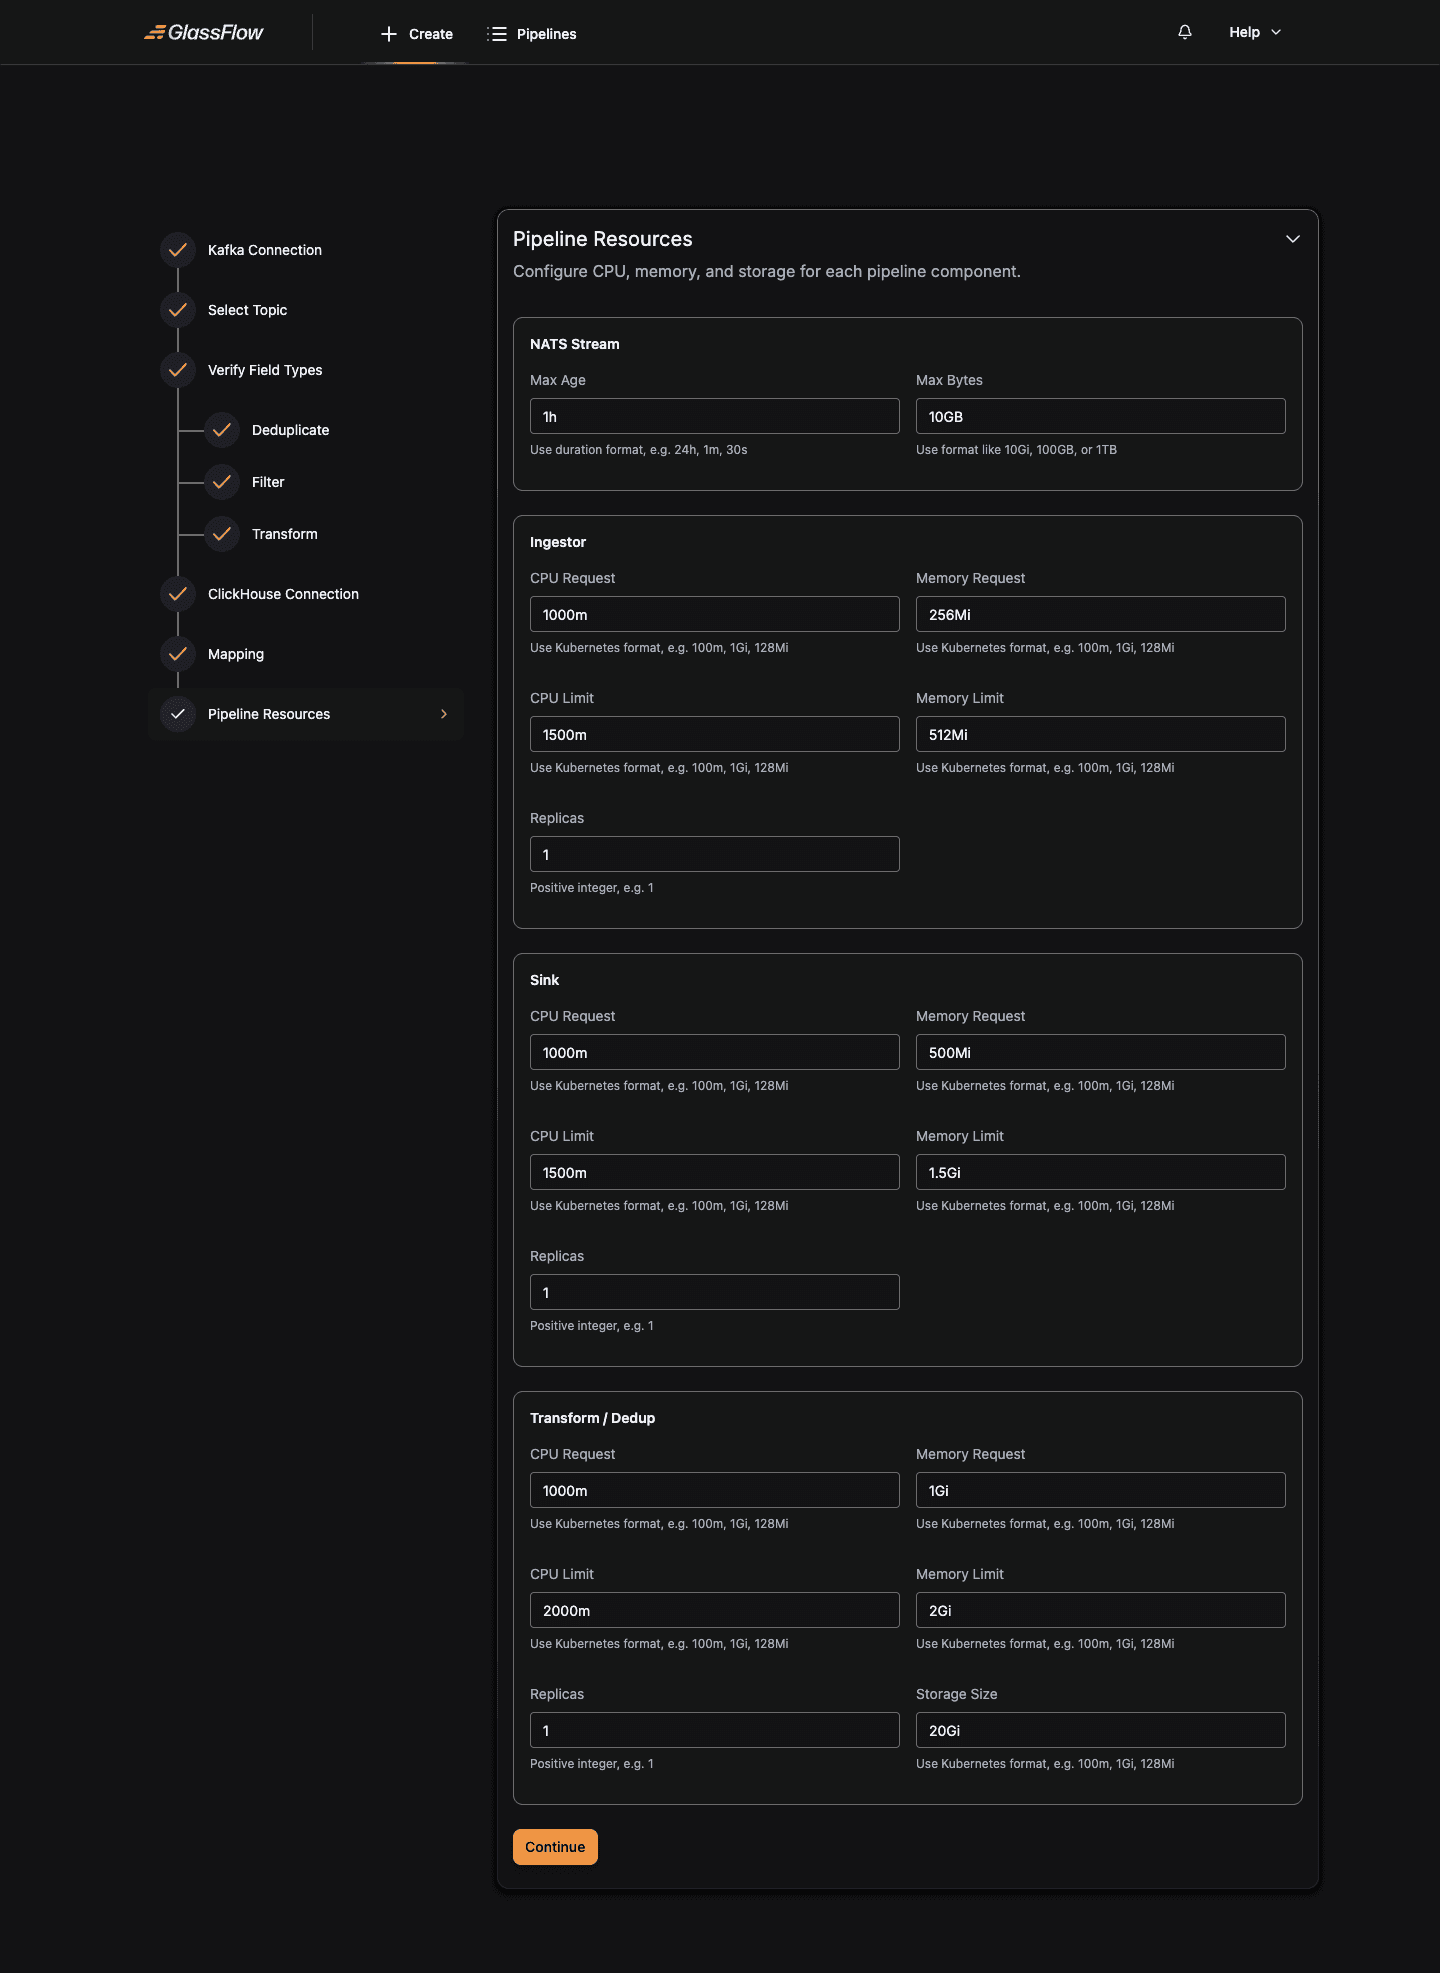
For each component, Ingestor, Sink, Transform/Dedup: you can configure:
| Field | Description |
|---|---|
| Replicas | Number of parallel instances. More replicas increase throughput for that stage. For Kafka sources, ingestor replicas must not exceed the topic’s partition count. |
| CPU Request / Limit | CPU allocated to each replica (Kubernetes format, e.g. 1000m, 2) |
| Memory Request / Limit | RAM allocated to each replica (Kubernetes format, e.g. 512Mi, 1Gi) |
The NATS Stream section controls the buffer between source and sink:
| Field | Description |
|---|---|
| Max Bytes | Maximum size of the NATS JetStream buffer (e.g. 10GB) |
| Max Age | Maximum retention time for buffered messages (e.g. 24h, 30s) |
For replica counts and resource values against specific throughput targets, see the Scaling Guide.
Click Continue to deploy the pipeline.
Deploy
The wizard validates the full configuration, generates the pipeline JSON, sends it to the GlassFlow API, and provisions the Kubernetes workloads. Once all components are healthy, the pipeline transitions to Active.

The pipeline detail page shows:
- Status:
Active,Stopped,Failed, etc. (see Pipeline States) - Dead Letter Queue: count of records the sink couldn’t write
- ClickHouse Table Metrics: total rows written and current insert rate
- Visual flow: source-to-sink topology with the current configuration inline
- Stop / Edit / Delete controls in the top-right menu
Creating a Multi-Topic Kafka Pipeline
Multi-topic pipelines combine data from two Kafka topics with a temporal join. Instead of Single-Topic Pipeline, click Multi-Topic Pipeline on the source-selection page. The wizard then asks for:
- Left Kafka connection + topic + schema
- Right Kafka connection + topic + schema: these can be the same cluster as the left, or a different cluster entirely
- Join configuration: choose the Join Type (
temporal), the Join Key field that appears in both topics, and the Time Window within which records from the two topics are considered a match - The rest of the wizard, Filter, Transform, ClickHouse Connection, Mapping, Pipeline Resources, works identically to the single-topic flow
The joined record carries fields from both topics; the Mapping step lets you map fields from either side to ClickHouse columns.
Next Steps
- OTLP pipeline guide, same wizard pattern for OpenTelemetry sources
- Pipeline Configuration Reference, JSON schema each wizard step produces
- Kafka Connections reference, detailed protocol and auth examples
- Scaling Guide, replica and resource recommendations